Custom Sign Images: Difference between revisions
| [unchecked revision] | [checked revision] |
Thetestgame (talk | contribs) Created page with "Starting with Eco 9.5 it is now possible to add image assets to Eco without the use of code for use on Signs or other text inputs that accept the '''<ecoicon>''' tag. == Add..." |
Sorry, trying to undo my mistake |
||
| (5 intermediate revisions by 4 users not shown) | |||
| Line 1: | Line 1: | ||
Starting with Eco 9.5 it is now possible to add image assets to Eco without the use of code for use on Signs or other text inputs that accept the '''<ecoicon>''' tag. | Starting with Eco 9.4.5 it is now possible to add image assets to Eco without the use of code for use on Signs or other text inputs that accept the '''<ecoicon>''' tag. | ||
== Adding a Custom Image == | == Adding a Custom Image == | ||
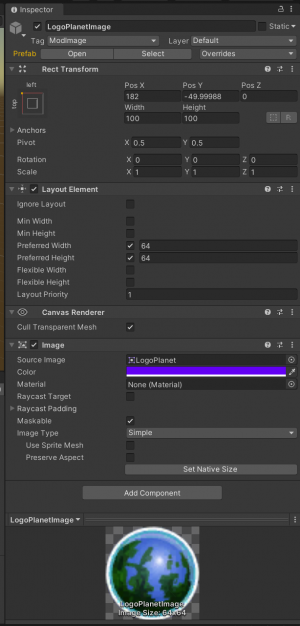
To add a custom image to Eco. Create a blank new client Modkit project and open the default modkit scene template. Create a new GameObject under the Items root GameObject. Similar to items there are naming rules that must be followed when creating this object. It should match "[YourUsageName]Image" In this example we are going to add LogoPlanetImage which will appear in game under "LogoPlanet". | To add a custom image to Eco. Create a blank new client Modkit project and open the default modkit scene template. Create a new GameObject under the Items root GameObject. Similar to items there are naming rules that must be followed when creating this object. It should match "[YourUsageName]Image" In this example we are going to add LogoPlanetImage which will appear in game under "LogoPlanet". | ||
| Line 6: | Line 5: | ||
Inside this GameObject you should have an Image component that contains your prepared sprite Image you'd like to add. In our case this contains the Eco planet logo. | Inside this GameObject you should have an Image component that contains your prepared sprite Image you'd like to add. In our case this contains the Eco planet logo. For best results try and keep your image file names short and ideally matching the name of the GameObject. A name that is too long may fail to load and show as plain text instead of the intended image. | ||
[[File:ExampleImage-SignTutorial.png|none|thumb]] | [[File:ExampleImage-SignTutorial.png|none|thumb]] | ||
From here you assign your scene tag and publish the Modkit bundle as normal. | From here you assign your scene tag and publish the Modkit bundle as normal. | ||
== Using the Custom Image == | == Using the Custom Image == | ||
To use your new image in game use the ecoicon tag with the name attribute containing the name of your new image GameObject. In our case that is <syntaxhighlight lang="html"> | To use your new image in game use the ecoicon tag with the name attribute containing the name of your new image GameObject. In our case that is <syntaxhighlight lang="html"> | ||
| Line 18: | Line 16: | ||
[[File:SignExample-SignTutorial.png|none|thumb]] | [[File:SignExample-SignTutorial.png|none|thumb]] | ||
[[Category:Modding]] | [[Category:Modding]] | ||
Latest revision as of 21:13, 25 October 2022
Starting with Eco 9.4.5 it is now possible to add image assets to Eco without the use of code for use on Signs or other text inputs that accept the <ecoicon> tag.
Adding a Custom Image[edit | edit source]
To add a custom image to Eco. Create a blank new client Modkit project and open the default modkit scene template. Create a new GameObject under the Items root GameObject. Similar to items there are naming rules that must be followed when creating this object. It should match "[YourUsageName]Image" In this example we are going to add LogoPlanetImage which will appear in game under "LogoPlanet".

Inside this GameObject you should have an Image component that contains your prepared sprite Image you'd like to add. In our case this contains the Eco planet logo. For best results try and keep your image file names short and ideally matching the name of the GameObject. A name that is too long may fail to load and show as plain text instead of the intended image.

From here you assign your scene tag and publish the Modkit bundle as normal.
Using the Custom Image[edit | edit source]
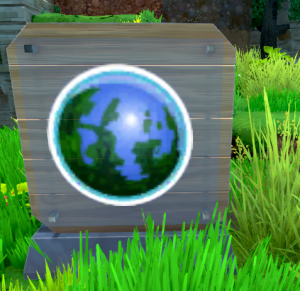
To use your new image in game use the ecoicon tag with the name attribute containing the name of your new image GameObject. In our case that is
<ecoicon name="LogoPlanet">The image will then try and automatically fill the available space. Note our example image is low resolution. You can use high resolution images for better quality.
