Getting Started with Eco Modding in Visual Studio
Introduction
This guide covers how you could use Visual Studio 2022 as the development environment for your Eco mods — from creating your project to building, testing, and releasing a mod.
This guide won’t teach you how to code or write a mod, but it will help you get everything set up so you’re ready to start learning. There will be helpful resources for learning listed at the bottom of this guide.
Have Ready
- A copy of the Eco game installed
- A file explorer and the file-path to
Ecofolder- At the time of writing, within this folder there's folders like
D3D12andEco_Data. Also, you'll find theEco.exefile here. There are other files and folder here too, but this list is just to help you know what the folder looks like.
- At the time of writing, within this folder there's folders like
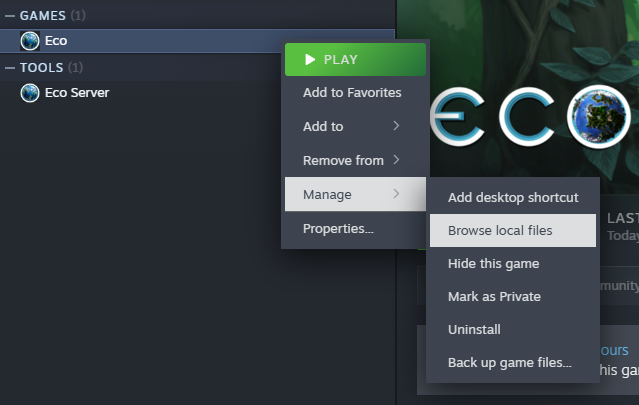
Note: Find Folder with Steam
Steam users can find the install folder by right-clicking on the game in your Steam Library:
Installing Visual Studio 2022
Visual Studio 2022 (VS2022) has a completely free to use version called the Community Edition. This guide is written assuming that's the version used.
Go to https://visualstudio.microsoft.com/downloads/#visual-studio-community-2022 and look for the "Visual Studio Community 2022" download. At the time of writing, the download button looked like:
Start the download by clicking on the Download button.
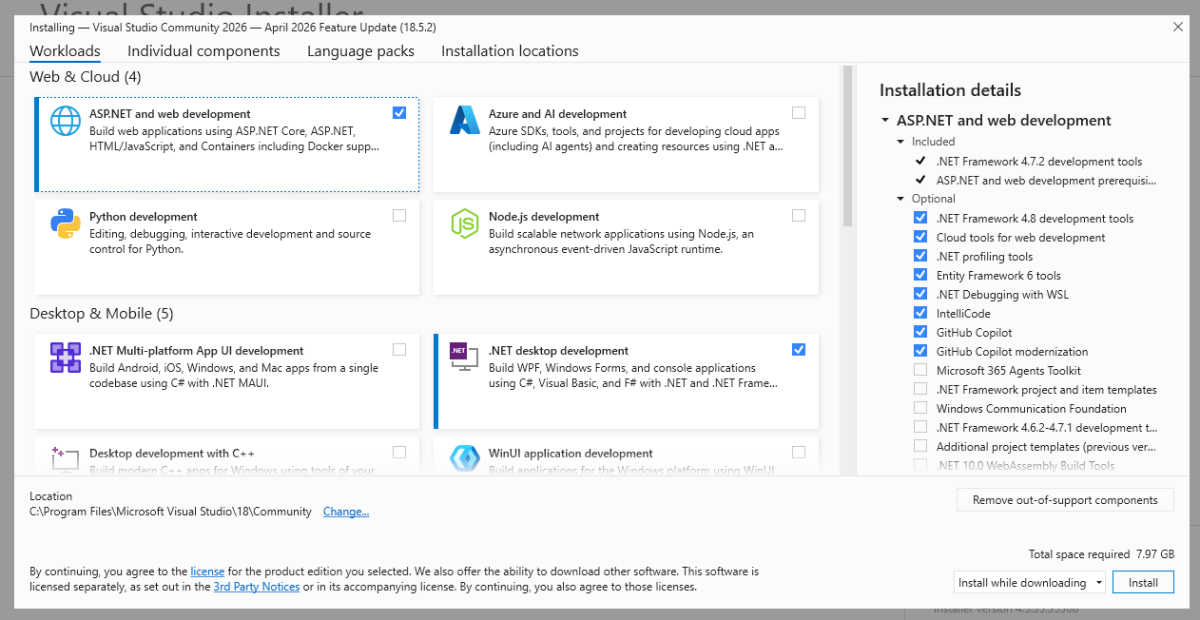
Then, run the installer till this the installer gets to the Workloads page. On this page, select these workloads:
- .NET desktop development -- Required for any mod development
- ASP.NET and web development -- Optional. If you want to interact with external websites or Eco's own web server (e.g. Discord's web-hooks or extending the API)
Note: Using the Workflow installation page is easy, but will install a few extra things (e.g. GitHub Copilot). If you want to keep the tooling minimal you can just install .NET from dotnet.microsoft.com/en-us/download. At the time of writing, Eco supports .NET version 8.0. See the later section .NET Version of this guide to learn how to check if that has changed.
At the time of writing, this is what the Workloads page looks like with those options selected:
Click the Install button. It will take a few minutes to complete installation. By default, it should launch VS2022 after it installs.
It will ask you to sign in. You do not need to and can completely avoid this by clicking the Skip and add accounts later option in tiny text below the buttons.
If you plan to upload your mod to Github, VS2022 does have integrated support for GitHub. So consider signing in with GitHub to make that process easier.
This guide is continuing as if the Skip and add accounts later option was selected. Finally, it might ask what color theme you'd like. Select your preference and continue.
Installation Complete!
The Mod
With Eco and VS2022 are installed all of the tools needed to code, build, and run a mod are ready!
Creating a New Project
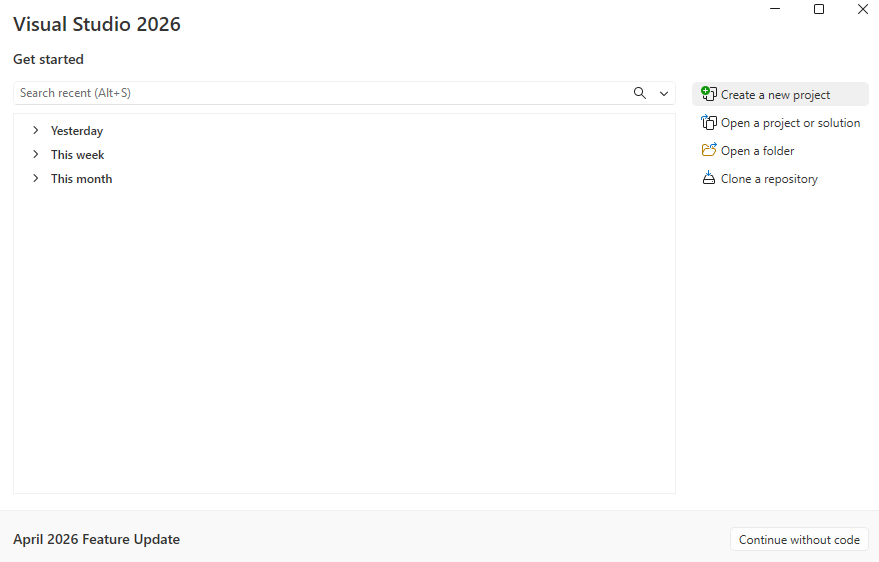
When VS2022 first opens it will show you a dashboard where you can quickly select what you want to do. On the left, are any recent projects opened. There won't be any if this is the first time installing it.
On the right there will be a few options, from here select the Create a new project option.
Now, it's time to go through the new project wizard. First, the wizard asks what kind of project is being made.
To mod Eco we need to make a C# Class Library.
To find the template, search C# library in the search bar. Select the C# option titled Class Library.
It's important to pay attention to the icon and chips below the title and description. Make sure you select the C# option as there are other options similarly named Class Library.

The next page will ask you what the Project Name should be. Type the name of the mod being created.
The other options like the Location and the Solution Name do not need edited.
Leave the box Place solution and project in the same directory unchecked.
Click the Next button and continue along in the next section of this guide.
.NET Version
At the time of writing, Eco targets .NET 8.0 and the mod should too.
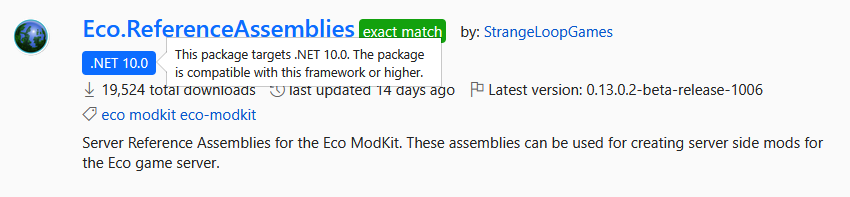
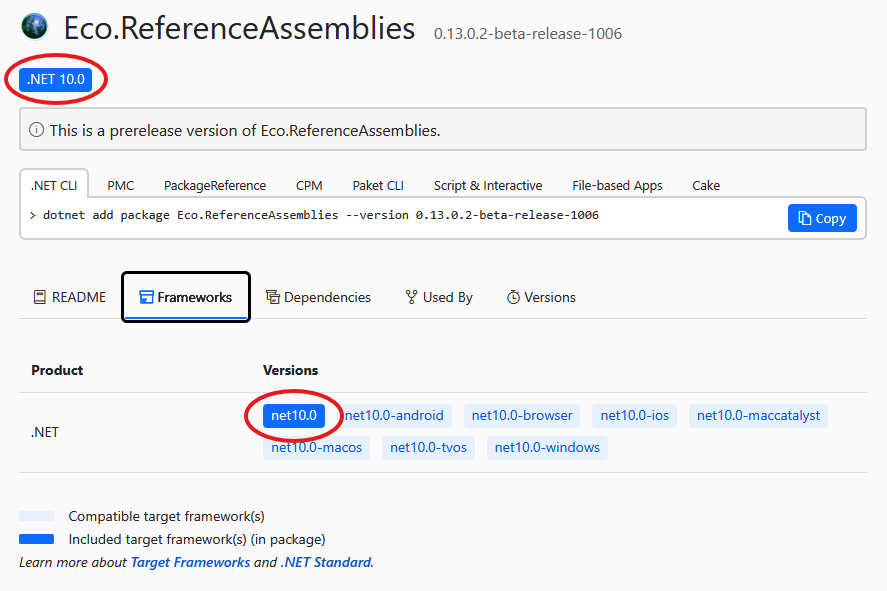
It's suggested to confirm the version of .NET that Eco uses by looking at the .NET version the reference assemblies use.
The reference assemblies can be found on the NuGet Gallery by searching for Eco.ReferenceAssemblies. See: www.nuget.org/packages?q=Eco.ReferenceAssemblies
Find the package with the name Eco.ReferenceAssemblies made by StrangeLoopGames.
There will be a chip underneath of it with the .NET version it targets. At the time of writing, this is what that page looked like:
By clicking on that search result (shown above), a more detailed page opens is show. Again, there's chips showing what version of .NET to use:
Back to VS2022
On the Additional Information page, there's the Framework drop-down. Select the same version of .NET Eco uses (as described above).
Click the Create button to finish creating the mod!
Linking to Eco Assemblies
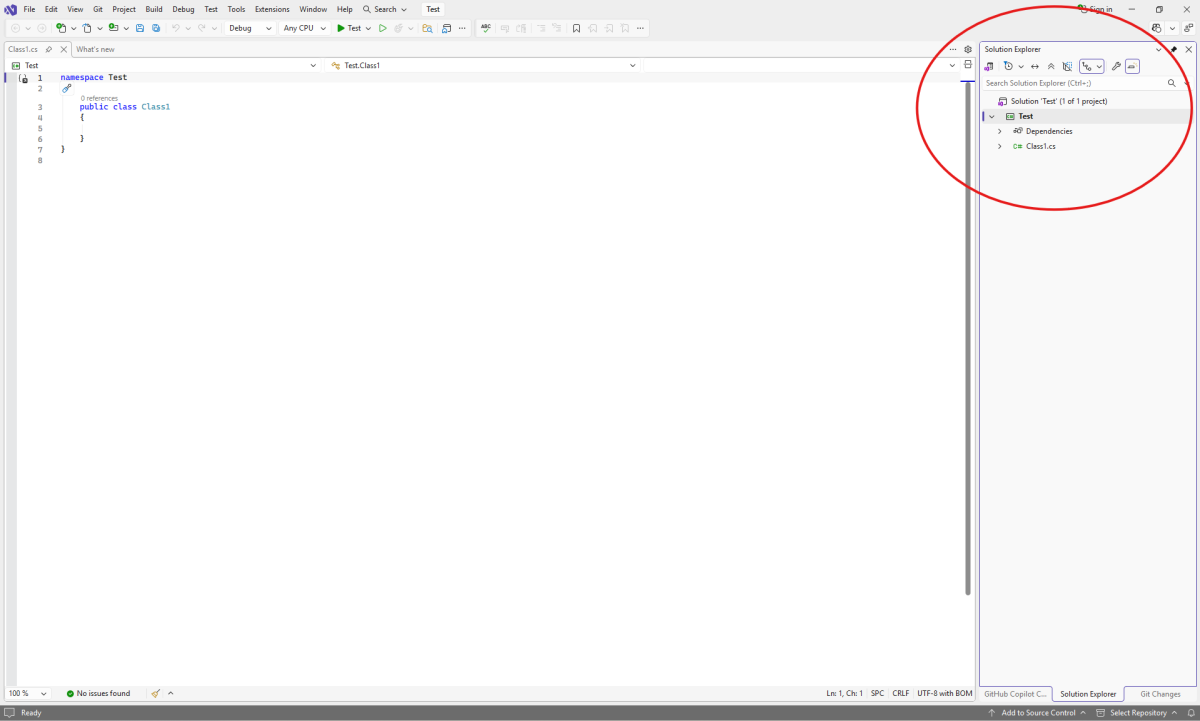
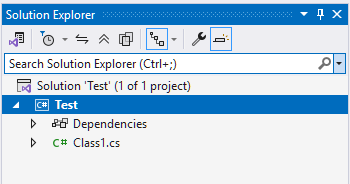
Look for the Solution Explorer on the right-hand side of VS2022. It should look something like this:
Note: If the solution explorer isn't there, open it from the top menu. Click the View button and select Solution Explorer from the menu.
From the Solution Explorer, find the References line and right-click on it. On that menu select Manage NuGet packages...
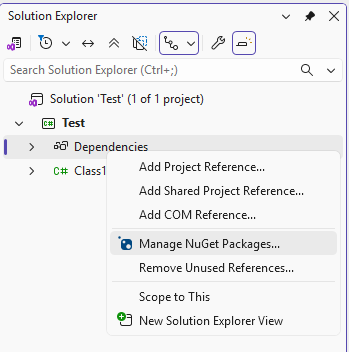
This will open a new tab. Above the search bar there's sub-tabs. Select the Browse sub-tab.
Type Eco.ReferenceAssemblies into the search bar.
Check the Include prerelease check-box.
Find the option with the name Eco.ReferenceAssemblies made by StrangeLoopGames. Click on it.
A details panel will show up to the right. It will show the version of the reference assemblies being targeted. By default it chooses the latest and can be left at it's default.
Click the Install button.

Click the Apply button on the popup to finish adding the references.
The reference assemblies have now been added! When coding VS2022 will provide IntelliSense popups. Try it out by going back to the Class1.cs file and typing Eco. and you will see suggestion pop up. It’s an essential tool for a lot of modders.
Building The Dynamic Linked Library (DLL)
Building for Development
To build the mod makes the .dllthat can be used to test with.
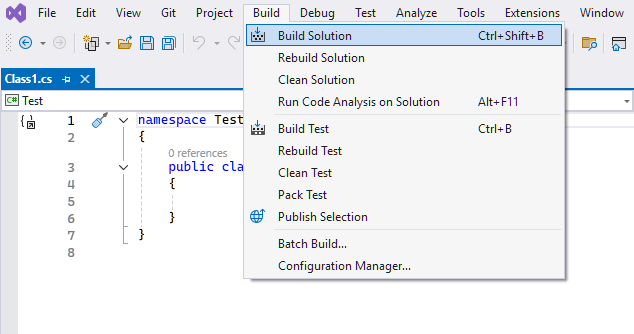
To build, open the Build menu from the top of VS2022.
Select Build Solution. This will produce non-optimized DLL used for testing and development.
To find the file VS2022 just built, right click on the project in the Solution Explorer.
Select Open Folder in File Explorer.
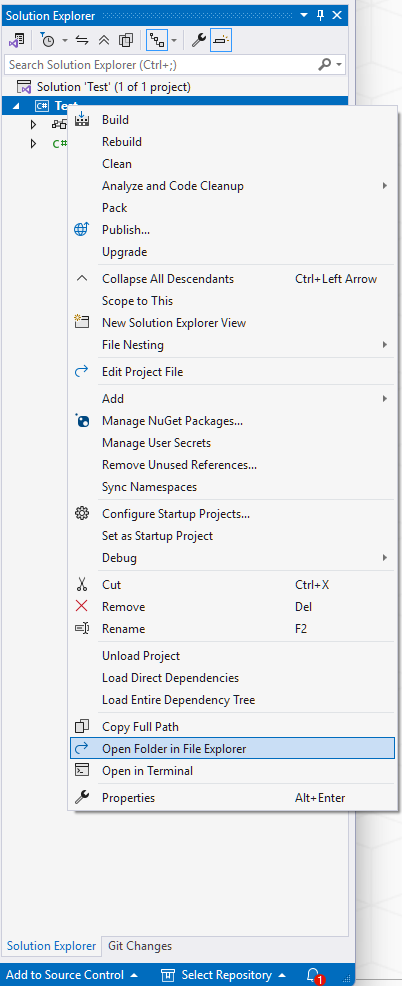
From here, the mod's DLL will be in the bin/Debug/net8.0/folder. The file will be named with mod's name, like TheMod.dll.
Copy the mod's DLL file.
Paste it into the folder Eco/Eco_Data/Server/Mods/.
To run a game with that mod create a local world.
The mod should be running. Check the logs at Eco/Eco_Data/Server/Logs/ to verify. Open the most recent log file here.
If the mod was loaded it there will be a line mentioning the file-name of the DLL. If the DLL was named TheMod.dll this is what to look for in the log file:
[13:55:54.815] [4] [ Info] [Eco] Starting ModKitPlugin                             ...
[13:56:27.399] [4] [ Info] [Eco] Starting ModKitPlugin                             ... Finished in 32.584 sec

[13:56:27.439] [4] [ Info] [Eco] Loading mods                                      ...
[13:56:27.439] [9] [ Info] [Eco] Loading TheMod...
Tip: Setup File Explorer to Sort By Date
It's suggested to setup the file view to Details in this folder because it will show the Date Modified for each file.

Additionally, clicking on the Date Modified header sorts all files. Sort it so the most recent is on top and every time the server starts the log file is easily found -- it's the one on top!

Building for Release
To build for release, click on the mod's project in the Solution Explorer to highlight it.
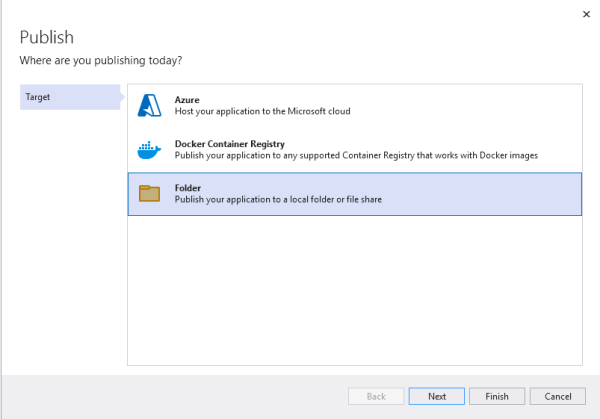
Then, open the Build menu from the top of VS2022 and select Publish Selection.
Set the target as Folder. Click the Next button.
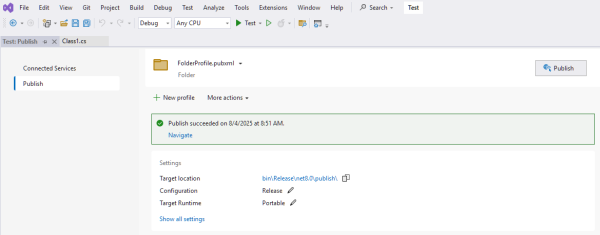
Leave the folder location as default. Click the Finish button.
Click the Close button.
Finally, click the Publish button to start the build.
A green alert will pop up when the build is completed:
Either use the blue links on this page to find the file or browse the project's files as shown in "Building for Development".
Inside the project, the file will be in bin/Release/net8.0/publish. The file will be named with the mod project's name. For example, TheMod.dll.
Since the reference assemblies are already included in the game, do not worry about the other files here.
To share this mod, the only file needed is the mod's dll -- TheMod.dll.
Post Build Scripts: Automatic Copy
With a post build script VS2022 will automatically copy the files each build. It's a very nice feature to have when developing and rebuilding every 5 minutes to test something new.
First, add the variables about where EcoServer.exe is located to the project file.
Right-click on the project in the Solution Explorer and select the Edit Project File option.
Add the properties EcoServerExe and EcoServerDir inside of the PropertyGroup tag.
>>> Tip: By holding shift and right-clicking on a file in the file explorer a old-school menu pops up. Midway down this menu is an option to Copy As Path. Neat!
The project file should look something like this (the quotes around the directory value is necessary because of the space in "Program Files (x86)"!):
<Project Sdk="Microsoft.NET.Sdk">

  <PropertyGroup>
    <TargetFramework>net8.0</TargetFramework>
    <ImplicitUsings>enable</ImplicitUsings>
    <Nullable>enable</Nullable>

    <EcoServerExe>$(EcoServerDir)\EcoServer.exe</EcoServerExe>
    <EcoServerDir>"C:\Program Files (x86)\Steam\steamapps\common\Eco\Eco_Data\Server"</EcoServerDir>

  </PropertyGroup>

  <ItemGroup>
    <PackageReference Include="Eco.ReferenceAssemblies" Version="0.11.1.13-beta-release-887" />
  </ItemGroup>

</Project>
Next, add the PostBuild property inside the Project tag.
<Project Sdk="Microsoft.NET.Sdk">

  <PropertyGroup>
    ... SNIP ...
  </PropertyGroup>

  <ItemGroup>
    ... SNIP ...
  </ItemGroup>

  <Target Name="PostBuild" AfterTargets="PostBuildEvent">
	<Exec Command="call PostBuild.bat $(EcoServerDir) $(OutDir) $(MSBuildProjectName)" />
  </Target>
</Project>
Finally create a new file directly inside the project by right-clicking on the project in the Solution Explorer. Select the Add and click on New Item... from the sub-menu.
Use the name PostBuild.bat for this new file.
Open it and put the following in the PostBuild file:
REM reading in arguements to sensible variables
set serverDir=%1
set outDir=%2
set projName=%3

REM removing double-quotes added to variables for concatenation
set serverDir=%serverDir:"=%
set outDir=%outDir:"=%
set projName=%projName:"=%

REM Copy mod dll to Mods dir
set dllFile=%outDir%%projName%.dll
echo Copying mod dll file: %dllFile%
copy "%dllFile%" "%serverDir%\Mods"

REM Copy mod pdb to directory where EcoServer.exe is
set pdbFile=%outDir%%projName%.pdb
echo Copying mod pdb file: %pdbFile%
copy "%pdbFile%" "%serverDir%"
Now try running a rebuild of the project. The output should report copying files and inside the Eco/Eco_Data/Server/Mods folder should be TheMod.dll file
Setting up Debugging
Special thanks to Monzun#0606 on Eco's Discord for helping developing research the following information. To setup debugging, make sure that the project is setup with the post build script described above.
Debugging is a powerful tool to a developer and allows the developer to set breakpoints anywhere in the code to stop execution. When execution is stopped the developer can review every variable's value and incrementally continue the code. This is invaluable when tracking down bugs or trying to understand a complex piece of code.
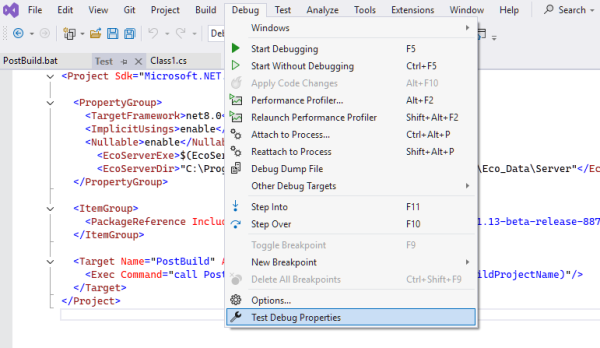
From the top menu, select Debug and click on the option TheMod Debug Properties at the bottom of the menu.
Find the Create a new profile button in the top-left of this new window. Select Executable from the drop-down menu.
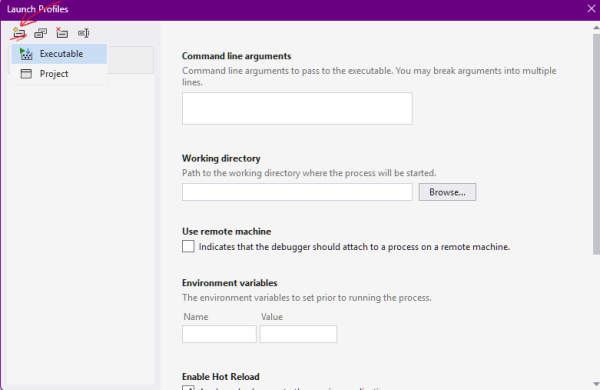
Set the Executable field to the full path to the EcoServer.exe file. For example, C:\Program Files (x86)\Steam\steamapps\common\Eco\Eco_Data\Server\EcoServer.exe.
Set the Working Directory field to the full path to the folder containing the EcoServer.exe file. For example, C:\Program Files (x86)\Steam\steamapps\common\Eco\Eco_Data\Server.
A fully configured profile ready to debug Eco on VS2022's launch profile page.
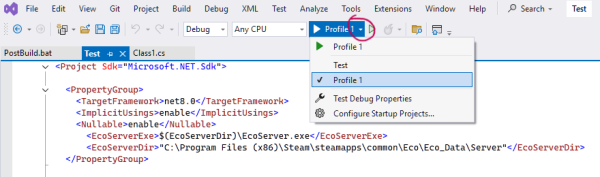
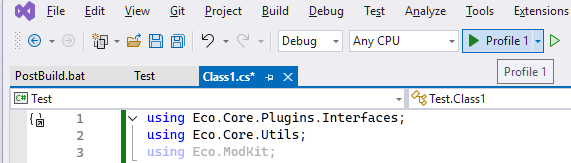
To use this newly configured profile, switch to it by clicking the small arrow to the right of the play icon (see image). Select the newly created profile -- Profile 1.
To see how breakpoints work, put the following in Class1.cs file:
using Eco.Core.Plugins.Interfaces;
using Eco.Core.Utils;
using Eco.ModKit;

namespace Test
{
    public class Class1 : IModKitPlugin, IInitializablePlugin
    {
        public string GetCategory() => "Tutorial";

        public string GetStatus() => this._status;
        string _status = string.Empty;

        public void Initialize(TimedTask timer)
        {
            this._status = "Ok";
            bool yes = true;
            return;
        }
    }
}
This code creates a basic plugin, called Class1, that Eco will load and initialize on startup. Eco knows to do this because this class inherits the IModKitPlugin interface (causes it to be loaded) and the IInitializablePlugin interface (causes it to be initialized).
Add a breakpoint to the code by right-clicking on the line bool yes = true;.
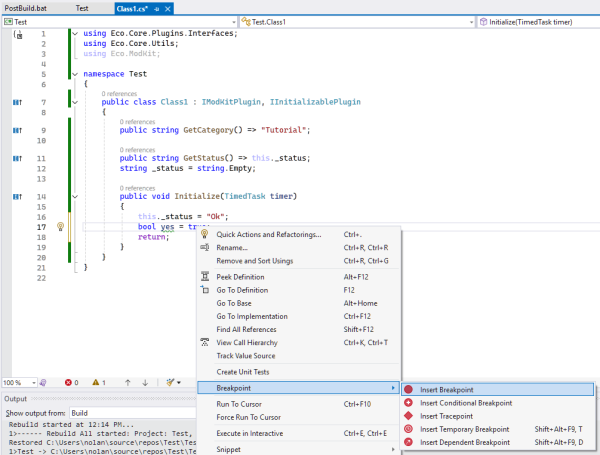
Now hit the play button. The server will start and VS2022 will flash back on screen once Eco tries to initialize the mod's plugin.
After a little bit the server will start-up and hit the breakpoint set. When it does VS2022 will keep startup from continuing and allow detailed inspection to happen.
In the bottom left (circled in red) is a table of all of the variables within scope. Use this to see what is happening (especially useful in loops!).
At the middle-top (circled in red) are some of the debugger controls. Clicking the highlighted Continue button resumes normal operation. Using the buttons to the right that are highlighted will allow the developer to step through the codes execution to see exactly how each line is performing. Debugging is a deep and rich topic that this guide will not explain further, but there's a great video by Microsoft Visual Studio on YouTube called Basics of Debugging. In that 45 minute video (don't worry there's annotations to jump to just what is interesting) a whole gamut of information about how to use debugging is covered.

Releasing a Mod
Mod.io
At the time of writing, mod.io is where creators share their mods with players and others.
To share a new mod here all that is necessary is an account.
Head over to mod.io/g/eco and click Login in the top-right corner.
Finish signing-up with whatever account type you prefer.
Click the Add Mod button in the top-right.
Follow the upload wizard as directed.
Once on the File Manager section, a zip file is needed.
Zip the mod's release dll and any other assets necessary (e.g. Unity bundles) by putting all the files into a folder. Then right-click on that folder and select Compress To... and from the sub-menu select ZIP file.
Upload that zip file. Considering naming it with a version number to help stay organized (e.g. v1). Next release, increase that number by 1 (e.g. v2)
Congratulations on releasing the mod!
Discord Ads
Consider posting a entry on the official Discord. There's a channel for mods called mod-ads. You can check it out here: discord.gg/PFHP8cUAhw.
Please read the rules before posting.
Where to Next?
- Where to learn modding logic (Eco Modding Wiki, Discord, sample mods)
- Consider learning source control (Git). Completely optional, but can help you keep things organized as development continues.
- Explore Eco’s open-source mod projects for ideas (search on GitHub "Eco Mods" to find some real-life examples)
